Making the Firefox Logo from HTML
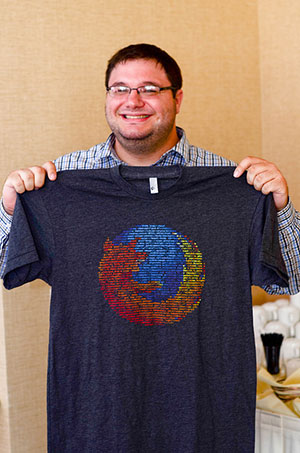
My Firefox t-shirt is probably the best t-shirt ever made. It's brilliant: a series of HTML/JS/CSS code wrapped and colored like the Firefox logo! Surely this design was created by aliens! Nope, it was created coworker Greg Koberger. Here Greg explains how to create a colored logo from page code!
When each new t-shirt means staving off laundry for yet another day, swag quickly becomes the most coveted perk at any tech company. Mozilla WebDev had pretty much everything going for it: brilliant people, interesting problems, awesome office. Everything except a t-shirt.
That had to change.
The basic idea for a t-shirt design came to me pretty quickly: the Firefox logo made entirely of code. The hard part was deciding what code to actually use. WebDev collectively writes thousands of lines a day, however none of it seemed substantial enough to be forever immortalized in dye ink and tri-blend fabric.
Then I had another idea. What if the code on the shirt, when typed out on a computer and run, produced itself: another Firefox logo made up of code. And this code could be run again to produce itself again, and so on.
Quines
"A quine is a program which prints its own listing. This means that when the program is run, it must print out precisely those instructions which the programmer wrote as part of the program (including, of course, the instructions that do the printing, and the data used in the printing)." - David Madore
My inspiration was a concept known as a quine. Unfortunately, the combination of web technologies, colored/shaped output and tiny t-shirts didn't lend itself to being a true quine, so I took a few liberties.
Real quines aren't allowed to take any input, and it's considered cheating to use a function that just copies the source code and prints it out. I did both, but it still makes for a cool t-shirt.
Let's call it quinspiration.
How It Works
The premise is simple:
- Get the full source of the HTML page, using document.documentElement.outerHTML. This doesn't give you doctype, so we put it back ourselves.
- Load an image of the Firefox logo from my server into a <canvas> element.
- Print out the source code character by character, and match up each character with its corresponding color from the logo
The full source can be found on Github (https://github.com/gkoberger/fxquine/) — or if you're up for an adventure, you can probably find a shirted Mozillian wandering around the Bay Area. I'll go over the more interesting code below, and you can see how it all fits together in the repo.
Getting Colors From An Image
You can get colors from an image by loading it into a <canvas> element. This also allows you to modify the image -- but for now, we just need to retrieve information.
// Create a new image
var image = new Image();
var imageData = false;
image.crossOrigin = '';
image.src = 'http://p.gkoberger.net/firefox/firefox.png';

// When it loads, we're going to put it into a canvas element
image.onload = function () {
    var cnvs = document.createElement('canvas');
    cnvs.width = image.width;
    cnvs.height = image.height;

    document.getElementsByTagName('body')[0].appendChild(cnvs);

    // This gives the drawing methods we need.
    var ctx = cnvs.getContext('2d');
    ctx.drawImage(image, 0, 0);

    // Only some browsers support getImageData.
    try {
        imageData = ctx.getImageData(0, 0, cnvs.width, cnvs.height);
    } catch (e) {
        alert("Your browser doesn't support");
        return;
    }
};

// Returns RGBA
function getColor(x, y) {
    if (!imageData) return;

    // Weird math to get the index; just trust me on this one
    var index = (y * imageData.width + x) * 4,
        red = imageData.data[index],
        green = imageData.data[index + 1],
        blue = imageData.data[index + 2],
        alpha = imageData.data[index + 3];

    // I'm returning RGBA, since it's something we can use when writing HTML
    return "rgba(" + red + "," + green + "," + blue + "," + alpha + ");";
}
This gives us getColor(x, y), which lets us get the color for any coordinates from the image.
CORS
One thing I skipped over above was the image.crossOrigin line in the code above. For security reasons, you can't get image data from images hosted on external domains. The shirt is no fun if you can't type out the code and run it yourself, so we have to work around this.
Cross-Origin Resource Sharing, or CORS, lets you allow certain resources to be accessed by external domains. First, we need to change the crossOrigin of the image we're loading in:
image.crossOrigin = '';
Then, we need to change the server to allow it. For this, we're going to put the following line in our .htaccess file:
Access-Control-Allow-Origin: *
Be careful; this will apply to all files, which could potentially have security implications. If you're going to host an image for something like this, it's probably smart to give it its own .htaccess file in its own folder/subdomain/etc.
And, if we know the domain that is requesting content, we might want to restrict it a bit more:
Access-Control-Allow-Origin: http://example.com http://example2.com
CORS has been around for a while, however canvas.getContext('2d') only got support for it recently. I made the t-shirts before it landed in Firefox, so I had to wait a few months to print them. I figured making a Firefox logo out of code Firefox can't run wasn't the best move.
The Rest
From there, it's all fairly simple math. Figure out how big the image should be, calculate how many characters per row, grab the color for each letter and insert a new element for each character. When you're done, remove the canvas from the page. Here's the complete code:
<!DOCTYPE html>
<html>
  <head>
    <meta charset="utf-8" />
    <title>Mozilla WebDev</title>
    <style>
      h1{
        text-align:center;
        color:#fff;
      }
      #fox{
        font-family:Courier;
        text-align:center;
      }
      body{
        background-color:#333;
        color:#444;
      }
    </style>
  </head>
  <body id="home">
    <div id="fox"></div>
    <script src="http://ajax.googleapis.com/ajax/libs/jquery/1.7.1/jquery.min.js"></script>
    <script>
var text = "<!DOCTYPE html>";
  text += jQuery("html").html();
  text = text.replace(/\s*(\n\s*)+/ig, "").replace(/\s+(?= )/g, "").split("");

var image = $("<img src='firefox-big-logo.png' />"),
    span = $("<span>", {
        text: "."
    });

$("#fox").append(span);

var span_width = span.width(),
    span_height = span.height();

span.remove();

image[0].crossOrigin = "";
image.load(function () {
    var cnvs = document.createElement("canvas");
    cnvs.width = image[0].width;
    cnvs.height = image[0].height;

    $("body").append(cnvs);

    var ctx = cnvs.getContext("2d");
    ctx.drawImage(image[0], 0, 0);

    var per_box = Math.floor(((cnvs.width * cnvs.height) / text.length)),
        ratio = span_height / span_width,
        x_size = Math.sqrt(per_box / ratio),
        y_size = per_box / x_size,
        imageData;

    try {
        imageData = ctx.getImageData(0, 0, cnvs.width, cnvs.height);
    } catch (e) {
        alert("Please try Firefox 9+ or Chrome!");
    }

    getPoints(imageData);

    $(cnvs).remove();

    function getPoints(imagedata) {
        var points = [],
            i = 0,
            lastSeven = "",
            title = false;

        for (var y = 0; y < cnvs.height - 1; y += y_size) {
            var total = 0,
                row = $("<span>").css({
                    "display": "block",
                    "height": span_height
                });

            for (var x = 0; x < cnvs.width - 1; x += x_size) {
                var color = getColor(imageData, x, y),
                    character = text[i];

                if (character == "<") title = false;
                if (title) color = "#fff";
                if (!color) color = "#444";

                points.push([x, y]);
                character = text[i];
                i++;
                total++;

                $(row).append($("<span>", {
                    "style": "color:" + color,
                    "text": character
                }));
                lastSeven = (lastSeven + character).substr(-7);

                if (lastSeven == "<" + "title" + ">") title = true;
            }
            $("#fox").append(row);
        }
        return points;
    }
});

/* get the color */
function getColor(imageData, x, y) {
    var x = Math.round(x),
        y = Math.round(y),
        index = (y * imageData.width + x) * 4,
        red = imageData.data[index],
        green = imageData.data[index + 1],
        blue = imageData.data[index + 2],
        alpha = imageData.data[index + 3];

    if (red == 0 && green == 0 && blue == 0) {
        return false;
    }
    return "rgb(" + red + "," + green + "," + blue + ");";
}
    </script>
  </body>
</html>
Getting it on a shirt was surprisingly hard. I rendered the design using HTML, but had no good way to export it for the printers. I landed on a fairly low-tech solution: opening the HTML file in Microsoft Word, and exporting it as a PDF. Not ideal, but it worked like a charm. I think it's safe to say it's the best looking t-shirt that has passed through Microsoft Word.
And that's the story of how Mozilla WebDev came to have its own t-shirt.


About Greg Koberger
Gregory Koberger is a developer and designer who loves the open web, brightly colored socks and sushi.


That is bad ass!
Awesome little project.
So where can we purchase this t-shirt?
I believe this shirt is for Mozilla WebDevs only, at present.
Amazing and wicked cool work!
Thanks for sharing.
It’s excellent, thanks for the explanation of Quines, reminds me the contests of coding visualizations & music in least amount of bytes. So fun..!
I have a suggestion, on the webpage the code in bold make the image stand out more :)
Go Mozilla, we love what you’re doing for the web!
Love the fire fox OS allot they are doing all thing great.
I actually like the concept of comparing the process with the new t-shirt laundry.
Thanks for explaining the Quines.
Man. This is some awesome stuff. I should try this trick for my loading page lol