
Duplicate the jQuery Homepage Tooltips Using MooTools
The jQuery homepage has a pretty suave tooltip-like effect as seen below:
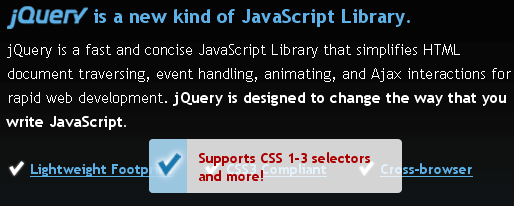
Here's how to accomplish this same effect using MooTools.
The XHTML
<div id="jq-intro" class="jq-clearfix">
	<h2>jQuery is a new kind of JavaScript Library.</h2>
	<p>jQuery is a fast and concise JavaScript Library that simplifies HTML document traversing, event handling, animating, and AJAX interactions for rapid web development. <strong>jQuery is designed to change the way that you write JavaScript.</strong></p>
	<ul class="jq-checkpoints jq-clearfix">
		<li><a href="http://docs.jquery.com/Tutorials" title="Lightweight Footprint" class="jq-thickbox">Lightweight Footprint</a>
			<div class="jq-checkpointSubhead">
				<p>About 18KB in size <em>(Minified and Gzipped)</em></p>
			</div>
		</li>
		<li><a href="http://docs.jquery.com/Tutorials" title="CSS3 Compliant" class="jq-thickbox">CSS3 Compliant</a>
			<div class="jq-checkpointSubhead">
				<p>Supports CSS 1-3 selectors and more!</p>
			</div>
		</li>
		<li><a href="http://docs.jquery.com/Tutorials" title="Cross-browser" class="jq-thickbox">Cross-browser</a>
			<div class="jq-checkpointSubhead">
				<p>IE 6.0+, FF 2+, Safari 3.0+, Opera 9.0+, Chrome</p>
			</div>
		</li>
	</ul>
</div>
The above XHTML was taken directly from the jQuery homepage -- no changes.
The CSS
#jq-intro 			{ padding-top:1em; width:605px; margin:0 auto; }
#jq-intro h2 		{ font-size:1.9em; font-weight:bold; color:#5DB0E6; line-height:1em; }
#jq-intro h2 span.jq-jquery { float:left; width:81px; height:23px; margin-right:.3em; position:relative; }
#jq-intro h2 span.jq-jquery span { position:absolute; left:-999999px; }
#jq-intro p 		{ clear:both; font-size:1.5em; margin:5px 0; font-weight:normal; line-height:1.6; }
#jq-intro ul 		{ padding:1.5em 0; list-style-type:none; }
#jq-intro li 		{ float:left; font-size:1.4em; }
#jq-intro li a 	{ color:#5DB0E6; font-weight:bold; text-decoration:underline; float:left; padding:0 30px 0 23px; }
#jq-intro li p 	{ font-size:12px; }
#jq-intro li 		{ position:relative; }
div.jq-checkpointSubhead { display:none; }
div.jq-checkpointSubhead { /*opacity:0.0001;*/ position:absolute; width:253px; height:54px; background:url(jquery-tooltip.png) 0 0 no-repeat; top:-1.5em; left:-35%; z-index:100; }
div.jq-checkpointSubhead p { font-size:1em; padding:10px 5px 0 50px; color:#AE0001; font-weight:bold; line-height:1.3em; margin:0; cursor:pointer; }
The above CSS has been slightly modified to match the CSS rules already in place on my demo page.
The MooTools JavaScript
/* moo style */
window.addEvent('domready',function() {
	//opacity / display fix
	$$('.jq-checkpointSubhead').setStyles({
		opacity: 0,
		display: 'block'
	});
	//put the effect in place
	$$('.jq-checkpoints li').each(function(el,i) {
		el.addEvents({
			'mouseenter': function() {
				el.getElement('div').fade('in');
			},
			'mouseleave': function() {
				el.getElement('div').fade('out');
			}
		});
	});
});
This effect is the epitome of a dynamic yet subtle JavaScript enhancement!






Actually, you need to set the chain option to properly replicate the effect:
el.getElement('div').set('tween', {chain: 'wait'});I assume
.fade('out')is just an alias of.tween('opacity', 0)so it should work.Sweet article, this is something that will come in handy in future. :)
Possible typo in the last line of the article: ‘epity’ should be ‘epitome’ ?
@Grant: Thank you — fixed.
@Oskar: Thanks, I’ll give that a shot.
Great, small and useful. Thank you.
Good job!!
I put this all on a test page, called the CSS and JS files, and uploaded it. But it does not work!
The page is the one I filled out in the “Website:” field, perhaps someone knows what I am doing wrong? I am relatively new to this world!
tnq
Hi David,
you don’t need to iterate over the elements with
each().(and I’m sure you know that ;-) )
directly write:
$$('.jq-checkpoints li').addEvents({
...
});
More infos here:
http://keetology.com/blog/2009/07/01-up-the-moo-herd-i-playing-fetch#double-dollar
Thx
ohh and replace:
el.getElement('div').fade('in');
...
el.getElement('div').fade('out');
with:
this.getElement('div').fade('in');
...
this.getElement('div').fade('out');