Responsive and Infinitely Scalable JS Animations
Back in late 2012 it was not easy to find open source projects using requestAnimationFrame() - this is the hook that allows Javascript code to synchronize with a web browser's native paint loop. Animations using this method can run at 60 fps and deliver fantastic game-like content interactions if one is careful to follow the rules.*
Around this time, I had joined Art.com labs and it just so happened that I had a compelling use case for an "iOS-style" interaction model around visual content-stream navigation - one which was responsive across multiple screen sizes and input paradigms (touch, pointer, trackpad). Out of this need came TremulaJS, a Javascript UI component designed to navigate large result sets of visual content with a high degree of UX fluidity.
This article takes a high-level look at how TremulaJS is organized with a focus on creating responsive, long-running animated interactions using Javascript.
*For those interested in an in-depth look at the fundamentals of a requestAnimationFrame() implementation, Julian Shapiro, creator of velocity.js, has succinctly body-slammed this this topic for your reading pleasure here. I view it as required reading for anyone embarking on a JS animation adventure.
TremulaJS: a component overview
TremulaJS is composed of five main components - The Scroll Axis, Momentum Loop, Content Grid, Content Box and Grid Projection.
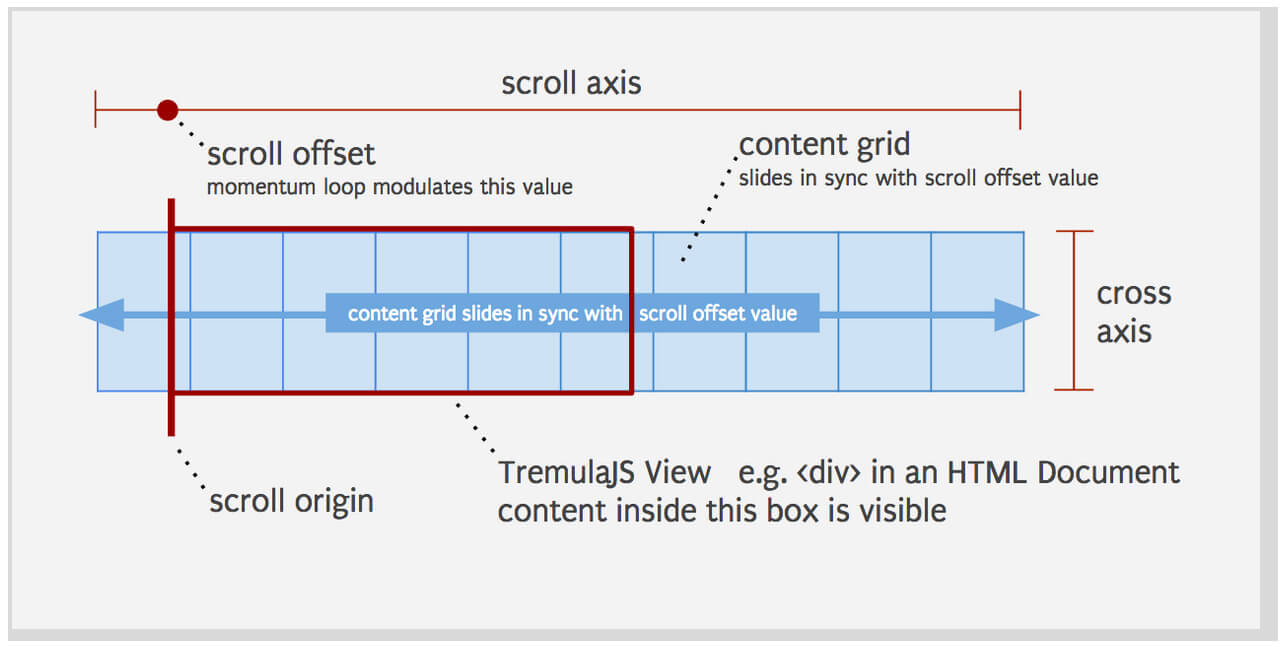 fig1. The Scroll Axis, Scroll Offset and Content Grid as they relate to the TremulaJS view container. This figure shows a grid of discrete content elements which are able to slide (on an axis) across the viewable area. Content outside this area is not rendered.
Scroll Axis
TremulaJS enables all kinds of micro-interactions, however, at the end of the day there is only one dimension of navigation and that is the Scroll Offset value. This value is encapsulated by the Scroll Axis object which among other things, manages horizontal and vertical orientation.
Momentum Loop
The momentum loop regulates the momentum value throughout the system. It is the sum of various sub-component outputs including: an internal momentum clock, various conditional dampening functions linked to Scroll Axis states and a user interaction event handler. On each animation frame it returns an instantaneous output value of momentum used to calculate the the scroll offset position.
Content Grid
The Content Grid is an abstraction model of content boxes arranged on a configurable XY grid. All content added to this grid is proportionally scaled along the Cross Axis to maintain normalized row (or column) dimensions.
On every frame, as momentum moves the Content Grid to a new position along the scroll axis, the Content Grid updates it's child Content Boxes with new relative positions. This is the abstraction that gives us opportunities to extend the painting process and make cool stuff happen…
Content Box
A Content Box is created for each unit of content appended to the Content Grid. A Content Box has width, height, an optional HTML template, and an optional main image which (if provided) is preloaded and transitioned on-screen by a CSS class. This should not be an unfamiliar paradigm to a web developer.
The interesting bit starts here: Each content block also maintains various primitive waveform values corresponding to it's own on-screen scroll progress. These waveforms can be mapped to animate any aspect of an Content Box DOM element in time and space. Let's zoom in on that with a diagram…
 fig2. Linear progression of a content block across the screen with a "ramp" waveform shown underneath.
In the figure above, we can follow a Content Block as it's moved across a screen and imagine that the output of our ramp waveform is mapped to a function which updates a CSS translateX() property.
This however is not the default behavior - it's a little more complex than that. Here is a simplified example of the default function called on a Content Box during a render cycle…
function updateContentBoxElementProperites(x,y) {
  var ramp = this.waveforms.headRamp,
    xo=x,
    yo=y,
    zo=0;

  this.e.style.transform = 'translate3d(' + xo + 'px,' + yo +'px, ' + zo + 'px)';
  //this.e.style.opacity = ramp;
  this.pPos = [x,y];//cache the current position in the Content Box model
}
This function is called when it's time to reposition our Content Box and we can see here that it is passed new coordinates. x & y are absolute values corresponding to the geometry of our TremulaJS view, these values are provided to the function by the Content Grid, which has knowledge of all Content Blocks and is able to efficiently crunch all the positions of all Content Boxes on the grid. The above function is then called on every Content Box on every animation frame.
Notice the commented opacity assignment. If we were to uncomment this we would see our content block fade-in as it moved from left to right (or fade-out as it moved from right to left.) This works because our ramp value is a derivative value (between 0 and 1) tied to a Content Box's scroll progress across our TremulaJS view. Conveniently, this.e.style.opacity is expecting a number between 0 and 1.
News Flash: turns out Bézier paths are super responsive
A look at the Grid Projection
There is a fifth component belonging to TremulaJS which enables us to take elements of a content grid and project that along a Bėzier path. Unsurprisingly, this is called a grid projection.
So to recap: As shown in the previous example, we are looking at a Content Box function that is executed on on every frame. This function is passed instantaneous x&y values corresponding to the Content Box's own orientation in the TremulaJS view at a particular point in time. This function is also passed several primitive waveform values corresponding to it's own on-screen scroll progress. It is at this point where we are able to remap an arbitrary Bezier path to virtually any CSS property. Let's take another look at the example above, except we will change the vertical position of our Content Box by replacing the absolute x&y position with one generated from our Bézier function.
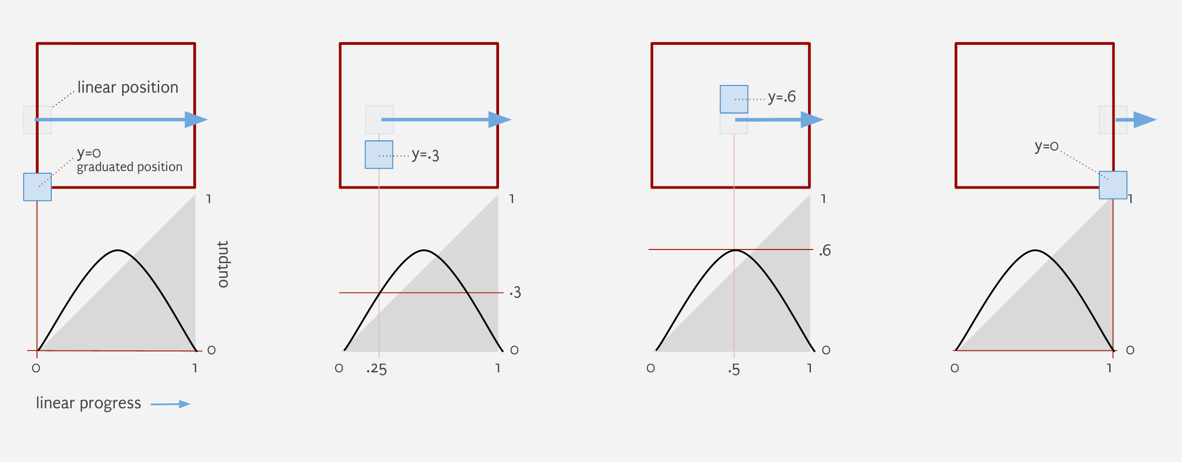 fig3. Linear progression of a content block across a view with a bézier waveform shown underneath. The Bézier output is now mapped to the x&y position of our content box within the TremulaJS view.
var bezierArcPath = [
  {x:0,y:0},
  {x:0,y:1},
  {x:1,y:1},
  {x:1,y:0}
];

function updateContentBoxElementProperites(x,y,env) {

  var path = bezierArcPath;

  var
    areaX = env.viewDims[0],
    areaY = env.viewDims[1],
    ramp = this.waveforms.tailRamp,
    xo=x,
    yo=y,
    zo=0;

  var xyFactor = [
    areaX,
    areaY
  ];

  var scaledPath = env.factorPathBy(path,xyFactor);

  var p = jsBezier.pointOnCurve(cubicBezier, ramp);
  var g = jsBezier.gradientAtPoint(cubicBezier, ramp);

  xo = p.x - (this.dims[0]*.5);
  yo = areaY - p.y - (this.dims[1]*.5);
  zo = 0;

  this.e.style.transform = 'translate3d(' + xo + 'px,' + yo +'px, ' + zo + 'px)';

  this.pPos = [x,y];
}
Please note: variable names in these examples have been changed/cleaned-up to enhance high-level understanding - actual code is not this pretty. Fork and improve!
In this example we have added a few methods to help implement our Bėzier transforms. First, let's look at env.factorPathBy(path,xyFactor). The responsive power of this utility function is great - it allows us to define any bounding box area (in this case, the current dimensions of the TremulaJS view), and scale our path in two dimensions such that the path will fit the box. What is returned is prescaled, ready-to-use path coordinates.
Next in our chain is jsBezier.pointOnCurve(cubicBezier, ramp). Which takes our scaled path and our current ramp output as parameters. Our transformed x&y values are returned. Many thanks here go to Simon Porritt for porting classical Bėzier math to JS and posting the jsBezier library to gitHub!
The rest should look familiar enough. We then make some small adjustments to x&y so that our content is positioned from its center origin.
But wait, theres more! (Just not in this article...)
Beyond this example, there are so many animations that can be created from these basic building blocks. For example, jsBezier.gradientAtPoint(cubicBezier, ramp) gives us instantaneous tangent values as content moves along our path, enabling coordinated content rotation among other possibilities. There is also the z axis and a primitive triangle waveform which enables depth effects (making content appear closer as it moves into the center of our view.
Curves can just as easily be used to produce easing effects or to keep our content on a single responsively positioned axis.
Another TremulaJS feature is Content Box momentum. When enabled, the content grid does not immediately update a Content Box's DOM as the Scroll Offset changes. Instead, the Content Box manages its own momentum value relative to its relationship of the motive force location (e.g. your finger or mouse pointer over the grid) - this can produce interesting content level momentum effects.
For those who are interested, there is a great path editing tool here...
https://www.desmos.com/calculator/d1ofwre0fr


About Garris Shipon
Garris lives in Berkeley California and is currently obsessed with creating super responsive discovery experiences. Read more at http://garriss.wordpress.com/about/


I got it
http://garris.github.io/TremulaJS/
Hi Hi :D
If you scroll the TremulaJS demo a bit faster it kinda bugs out though and starts going on a extremely fast for a couple of loops. Not really a fan of that :P
Hey Andrea, TremulaJS is an actively maintained project. If you’ve found a bug, please file it here… https://github.com/garris/TremulaJS/issues
Doing this makes TremulaJS (which I have made available *completely free* BTW) better for everyone. If you have some constructive feedback on the UX you can file it there as well. Please include your device, os and use-case so everyone can benefit. Yeah?