Dress Up Your Select Elements with FauxSelect
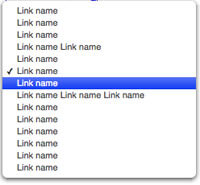
I received an email from Ben Delaney a few weeks back about an interesting MooTools script he had written. His script was called FauxSelect and took a list of elements (UL / LI) and transformed it into a beautiful Mac-like SELECT element. Ben asked me to take a look at his script and look to improve or class-ify it. I've done just that.
The XHTML
<select name="items" class="faux">
	<option> value="1">Item 1</option>
	<option> value="2">Item 2</option>
	<option> value="3">Item 3</option>
	<option> value="4">Item 4</option>
	<option> value="5">Item 5</option>
	<option> value="6">Item 6</option>
	<option> value="7" selected="selected">Item 7</option>
	<option> value="8">Item 8</option>
	<option> value="9">Item 9</option>
	<option> value="10">Item 10</option>
</select>
While Ben used a UL element, I chose to use a SELECT element so that the script degrades well.
The CSS
#FS-Container * { margin:0; padding:0; }
#FS-Container 	{ position:relative; z-index:5000; width:230px; overflow:visible; }
#FS-HideLayer 	{ display:none; width:100%; height:100%; position:absolute; left:0; top:0; z-index:3000; background:#fff; opacity:0; -moz-opacity:0; filter:alpha(opacity=0); }
#FS-HideLayer.Visible {	display:block; }

#FS-Selector 	{ position:relative; display:none; overflow:visible; z-index:5000; left:0; top:3px; }
#FS-Selector.Visible { display:block; z-index:5000!important; }
#FS-Selector .Shadow { position:absolute; display:block; }

#FS-Selector #FS-NW { width:11px; height:9px;  top:-9px; left:-11px; background-image:url(FauxSelect/fs-nw.png); background-position:top left; background-repeat:no-repeat; }
#FS-Selector #FS-N  { width:100%; height:9px;  top:-9px; left:0; background-image:url(FauxSelect/fs-n.png); background-position:top left; background-repeat:repeat-x; }
#FS-Selector #FS-NE { width:11px; height:9px;  top:-9px; right:-11px; background-image:url(FauxSelect/fs-ne.png); background-position:top left; background-repeat:no-repeat; }
#FS-Selector #FS-E  { width:6px;  height:100%; right:-11px; background-image:url(FauxSelect/fs-e.png); background-position:top left; background-repeat:repeat-y;}
#FS-Selector #FS-SE { width:11px; height:12px; bottom:-12px; right:-11px; background-image:url(FauxSelect/fs-se.png); background-position:top left; background-repeat:no-repeat; }
#FS-Selector #FS-S  { width:100%; height:12px; bottom:-12px; left:0; background-image:url(FauxSelect/fs-s.png); background-position:top left; background-repeat:repeat-x; }
#FS-Selector #FS-SW { width:11px; height:12px; bottom:-12px; left:-11px; background-image:url(FauxSelect/fs-sw.png); background-position:top left; background-repeat:no-repeat; }
#FS-Selector #FS-W  { width:6px;  height:100%; left:-11px; background-image:url(FauxSelect/fs-w.png); background-position:top left; background-repeat:repeat-y; }

#FS-Selector	{ padding:0; margin:0; }
#FS-Selector li { font-family: "Hevetica Neue", Helvetica, Arial, "Lucida Grande", sans-serif; font-size: 11px; line-height:11px; color:#444; display:block; padding:2px 15px; margin:0 -5px; }

#FS-Selector li.Selected { background:url(FauxSelect/fs-li-highlight-checks.png) left bottom no-repeat; }
#FS-Selector li:hover 	 { background:url(FauxSelect/fs-li-highlight-checks.png) left top repeat-x; color:#fff; }
#FS-Selector li.Selected:hover { background:url(FauxSelect/fs-li-highlight-checks.png) left center no-repeat; }

#FS-Trigger			{ cursor:pointer; border:1px solid #999; background:#ddd; padding:3px; }
There's quite a bit of CSS involved, as you can imagine. I don't recommend modifying anything but the #FS-Trigger selector. The #FS-Trigger is the default look of the select box.
The MooTools JavaScript
(function($){
	//faux select class
	this.FauxSelect = new Class({

		//implements
		Implements: [Options,Events],

		//options
		options: {
			cssPrefix: 'FS-',
			triggerText: 'Select Something'
		},

		//initialization
		initialize: function(elements,options) {
			//set options
			this.setOptions(options);
			//set elements
			this.elements = $$(elements);
			//apply to default elements
			this.elements.each(function(el){
				this.apply(el);
			},this);
		},

		//applies the Faux look to every desired element
		apply: function(element) {
			//settings and shortcut vars
			var c = this.options.cssPrefix;

			//create the replacement DIV container
			var container = new Element('div',{
				id: c + 'Container'
			}).replaces(element);

			//create a hidden input with the same name to store the value
			var input = new Element('input',{
				value: '',
				type: 'hidden',
				name: element.get('name')
			}).inject(container);

			//provide the "trigger"
			var trigger = new Element('span',{
				text: this.options.triggerText,
				id: c + 'Trigger'
			}).inject(container);

			//provide the list
			var list = new Element('ul',{
				id: c + 'Selector'
			}).inject(container);

			//inject the options into the list
			element.getElements('option').each(function(option){
				var li = new Element('li',{
					text: option.get('text'),
					'class': (option.selected ? 'Selected' : '')
				}).inject(list);
				li.store('value',option.get('value'));
				if(option.selected) { input.value = option.value; }
			});

			//create the replacement elements
			var FSHideLayer = new Element('div', {
			    'id': c + 'HideLayer',
			    'html': ' ',
				'events': {
			        'click': function(){
						$$(this,list).removeClass('Visible');
			        }
			    }
			});
			var nwShadow = new Element('div', {'id': c + 'NW', 'class': 'Shadow', 'html': ' '});
			var nShadow = new Element('div', {'id': c + 'N', 'class': 'Shadow', 'html': ' '});
			var neShadow = new Element('div', {'id': c + 'NE', 'class': 'Shadow', 'html': ' '});
			var eShadow = new Element('div', {'id': c + 'E', 'class': 'Shadow', 'html': ' '});
			var seShadow = new Element('div', {'id': c + 'SE', 'class': 'Shadow', 'html': ' '});
			var sShadow = new Element('div', {'id': c + 'S', 'class': 'Shadow', 'html': ' '});
			var swShadow = new Element('div', {'id': c + 'SW', 'class': 'Shadow', 'html': ' '});
			var wShadow = new Element('div', {'id': c + 'W', 'class': 'Shadow', 'html': ' '});
			var ShadowParts = new Array(nwShadow, nShadow, neShadow, eShadow, seShadow, sShadow, swShadow, wShadow);

			//Inject the created elements
			FSHideLayer.inject(container, 'after');
			ShadowParts.each(function(el){
				el.inject(list, 'top');
			});

			//The "trigger" and "hide" events
			trigger.addEvent('click', function(){
				$$(FSHideLayer,list).addClass('Visible');
			});

			//What to do when each link is clicked
			var listItems = list.getElements('li');
			listItems.each(function(FSLink){
				FSLink.addEvent('click', function(event){
				    event.stop(); //Prevents the browser from following the link.
					listItems.removeClass('Selected');
					this.addClass('Selected');
					var FSLinkId = this.getProperty('id');
					$$(FSHideLayer,list).removeClass('Visible');
					//This is where you do something with the returned ID for the selected item...
					input.value = FSLink.retrieve('value');
					alert('The value is ' + input.value);
				});
			});
		}

	});

	//usage
	window.addEvent('domready',function(){
		var FS = new FauxSelect('.faux');
	});
})(document.id);
There's quite a bit of MooTools involved. Once provided with the necessary elements, we:
- Create a series of DIVS for the new layout
- Create a list element containing all of the possible SELECT > OPTION values and labels
- Add events to handle clicking on individual list items or the body (to hide the list).
A bravo and thank you to Ben Delaney for his work and allowing me to "classify" his great idea. It takes a lot of guts to ask someone to try to improve something -- I had a hard time doing so at first too. Ben's FauxSelect script is a great way to make ugly inputs look outstanding. Great work Ben!


Nice, but few notes (as always :P ) :
It would be better to use classes than IDs, so that you can have multiple FauxSelect elements on one page.
event.preventDefault()would be more appropriate for line 99 as you might probably want the click event to propagate.Is there a z-indexing issue? The border bottom on the #FS-Trigger is showing though the FS-Container/Selector.
Nice work!
Nice!
Reminds me of this one, based on Mootools as well…
Superb, the sooner we can style select box in css the better :)
This is a lot of work for something that’s not as effective as the normal select box…I would not use something like this
@Adriaan: Always so negative! Consider it a proof of concept or a taste of the future?
I’m seeing lots of things like this popping up. Its great :)
I only dislike the fact that I can’t see the active selection.
I’d add in cursor: default for the items so you don’t get the odd text select tool.
And if we’re going with Mac style, Lucida Grande should be the first font since it’s the system font (13pt to be exact)
Nice class!
@adriaan
You can’t hide an tag in some browsers, and sometimes you want to. This would be the only way to do it.
There are certainly other things you can’t do with that you could do with this, while still wanting to maintain the standard user interface widget.
That said, setting an option to disabled is usually good enough for me!
check the xhtml. the option tag is incorrect ( <option> value=”1″>Item 1</option> ).
other than that, a great post.. as always! :)
Great class! and very customizable via CSS.
However, it would be nice to have multiselect.
By the way, something like this but Facebook like?, just like the one for choosing groups for your friends?!
Regards,
Alex
Not Firefox Friendly so I have doubts about Opera too.
I must add that code for the result of selection paste into a text area box and did not appear in a window ‘alert’?.
Thanks.
This is really great. I’m going use it in my site. I’m sure my readers will love it.