Create a Clearable TextBox with the Dojo Toolkit
4/18/2011: ClearTextBox has been updated to hide the clear icon when the value is empty. ClearTextBox has also been updated to use this.connect instead of dojo.connect for code efficiency reasons described by Chris Barber within the comments below.
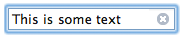
Usability is a key feature when creating user interfaces; it's all in the details. I was recently using my iPhone and it dawned on my how awesome the "x" icon is in its input elements. No holding the delete key down. No pressing it a billion times. No attempt to highlight the text and then delete. It's one tap. Boom. Text gone. With that in mind, I took Dijit's dijit.form.TextBox and created my own widget which features a clear link.
The CSS
We'll need to add some padding to the TextBox domNode to prevent text running behind the widget. Then we'll use some absolute positioning to position the clear link to the right. The border of the TextBox widget is on a wrapping DIV, not the INPUT element itself, so the link will appear inside the bordered box:
/* Define clear */
.claro .davidwalshClearBox {
	padding-right: 25px;
	position: relative;
}
.claro .davidwalshClearBox a.davidwalshClear {
	width: 12px;
	height: 12px;
	display: block;
	overflow: hidden;
	text-indent: -5000px;
	position: absolute;
	top: 4px;
	right: 5px;
	background: url(closeButtonSprite.png) 0 0 no-repeat;
	z-index: 2000;
	cursor: pointer;
}
.claro .davidwalshClearBox a.davidwalshClear:hover {
	background-position:-12px 0;
}
.dj_ie .claro .davidwalshClearBox a.davidwalshClear	{
	top:2px;
}
Unfortunately there's a IE-specific hack to get the link vertically centered within the box. Damn.
The Dojo JavaScript
My first attempt had me creating a custom template for the widget; I copied dijit.form.TextBox's template and added the clear link within the HTML. The problem with that was if dijit.form.TextBox's template changed, my widget template could be obsolete and troublesome because I inherit from other parts of TextBox. I instead chose to inject a link and adjust sizing within the postCreate method:
// Provide our new class
dojo.provide("davidwalsh.form.ClearTextBox");

// Request dependencies
dojo.require("dijit.form.TextBox");

// Declare our new class
// Declare our new class
dojo.declare("davidwalsh.form.ClearTextBox", dijit.form.TextBox,{

	// The "Delete" word
	deleteText: "Delete",

	// Fire the change event for every text change
	intermediateChanges: true,

	// PostCreate method
	// Fires *after* nodes are created, before rendered to screen
	postCreate: function() {
		// Do what the previous does with this method
		this.inherited(arguments);

		// Add widget class to the domNode
		var domNode = this.domNode;
		dojo.addClass(domNode, "davidwalshClearBox");

		// Create the "X" link
		this.clearLink = dojo.create("a", {
			className: "davidwalshClear",
			innerHTML: this.deleteText
		}, domNode, "first");

		// Fix the width
		var startWidth = dojo.style(domNode, "width"),
			pad = dojo.style(this.domNode,"paddingRight");
		dojo.style(domNode, "width", (startWidth - pad) + "px");

		// Add click event to focus node
		this.connect(this.clearLink, "onclick", function(){
			// Clear the value
			this.set("value", "");
			// Focus on the node, not the link
			this.textbox.focus();
		});

		// Add intermediate change for self so that "X" hides when no value
		this.connect(this, "onChange", "checkValue");

		// Check value right away, hide link if necessary
		this.checkValue();
	},

	checkValue: function(value) {
		dojo[(value != "" && value != undefined ? "remove" : "add") + "Class"](this.clearLink, "dijitHidden");
	}
});
As always, the first steps of creating a Dojo class are providing the new class and requiring its dependencies. The next step is declaring the new class by providing the class name as the first argument, its dependencies as the second argument, and its properties in method in the third. The postCreate method within a Dijit widget fires after all nodes in the template have been created but before the widget is rendered to the page. So once I have the widget's wrapping domNode, I add the widget's special CSS class and create the "X" clear link. With the link in place, I measure the domNode and subtract the padding we added with the CSS class so that the widget conforms to the width desired by the instance. The last step is adding a click event to the node clears the INPUT's value and focuses on it.
Thanks to Dojo's powerful inheritance system, my custom class can remain small but lethally potent! Try out the demo on your mobile phone -- it will work great!


Well done! Dijit has come a long way allowing you to easily do things like this.
omg, complicated.
Just noticed that you could change
dojo.connect(clearLink,"onclick",this,function(){to
this.connect(clearLink,"onclick",function(){so that the onclick event is disconnected when the the widget is destroyed instead of page unload. It’s not a huge deal as long as you’re not created and destroy several of these textboxes in a single page view.
Hey David, heads up. I’m using FF4 Beta right now, and for some reason I couldn’t scroll on your website, though I could still use the scroll bar to move up and down.
cool… I like it..
hi david
for support rtl language,i edit your code,i should do anything else?
add:.claro .davidwalshClearBoxRtl { padding-left:25px; padding-right:0px !important; } remove: right:5px; from .claro .davidwalshClearBox a.davidwalshClear dojo.addClass(this.domNode,(this.isLeftToRight())?"davidwalshClearBox":"davidwalshClearBox davidwalshClearBoxRtl"); add style:(this.isLeftToRight())?"right:5px":"left:5px" to dojo.create("a" edit:pad = dojo.style(this.domNode,(this.isLeftToRight())?"paddingRight":"paddingLeft");Fantastic! MooTools version please!! ;o)
Using this.connect has issues when you extend this widget.
For example: this.connect(clearLink,”onclick”,this, “clearTextBoxValue”);
When I try to connect to ‘clearTextBoxValue’ from child class:
dojo.connect(this, “clearTextBoxValue”, this, “_doSomething”);
_67.apply is not a function
[Break On This Error] return _67.apply(_66,arguments||[]);
Changing to dojo.connect(clearLink,”onclick”,this, “clearTextBoxValue”); – fixed the issue
Btw, can I freely reuse this or is there any restriction? Thanks.
Feel free to use however you’d like!
This is really nice post, I have just started the dojo, this will be helpful, great stuff, keep it up..
Has anyone successfully ported this to use dojox.mobile.TextBox?
I’m not aware of anyone doing that, but it really shouldn’t be too hard. The CSS selectors need to be changed, and “dijit.form.TextBox” will need to be changed. That should be just about it.
The problem I am encountering is the onChange event doesn’t fire on each keystroke because the intermediatechanges option isn’t available in dojox.mobile.TextBox since it uses dijit.form._FormValueMixin as opposed to _FormWidgetMixin.
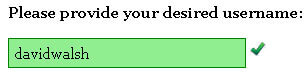
Great article!! I will try this widget out. Question – how do you get the blue hilited boarder when the text box receives focus? TIA. Steve
That’s a Mac feature.
Has any one tried the same implementation for dojox.mobile.textbox. ?
I think i tried basically the same but iPhone virtual keyboard foiled my plans.
I ended up by creating a wrapping div, which also solved layouting problems with 100% width in the end.
You can contact me for my class if you are in need.
Kind Regards
gizmore from wechall