Create a Dojo-Powered WordPress Website View
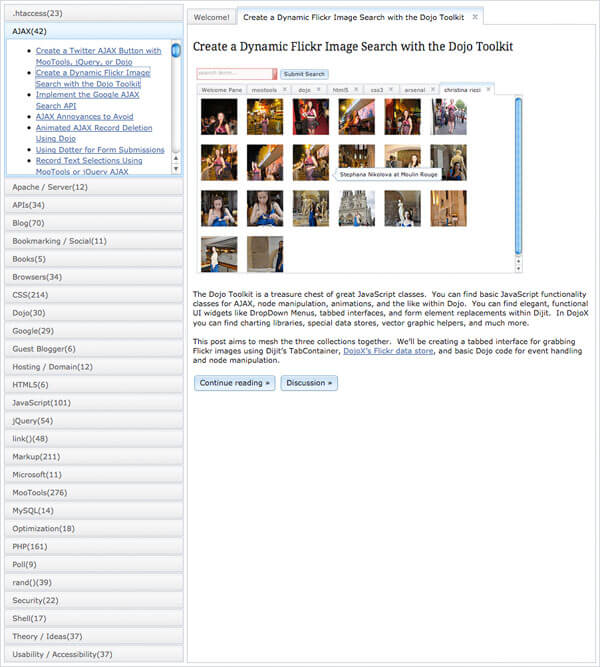
Yesterday I showed you WordPress' awesome JSON plugin named JSON API. Now that I can get my blog posts in JSON format, it's time to create an awesome AJAX'ed web app with that data. I've chosen to use the power of Dojo and Dijit to create a stylish, AJAX-powered web app which provides intelligent views of all of my blog posts. You wont want to miss this post!
The HTML
There's very little HTML (initially) to get the app going; simply create a container DIV with explicit size dimensions which will act as a application "holder":
<body class="claro">
	<!-- will set the eventual dimensions for the tab container -->
	<div style="width:900px;height:1000px" id="appbase"></div>
</body>
These size dimensions will allow use to use height and width settings of 100% for our inner widgets. Note that I'm showing you the BODY tag -- I'll be using the claro theme for my page.
The CSS
There's no app-specific CSS required. You do, however, need to pull in the CSS file for the desired theme.
/* bring in the claro theme */
@import "http://ajax.googleapis.com/ajax/libs/dojo/1.5/dijit/themes/claro/claro.css";
As I mentioned above, I'm using the new claro theme.
The Dojo JavaScript
There's a good amount of JavaScript required to make this awesome layout work so I've broken it down by task.
Requiring Dijit Classes
As always, requiring Dojo and the classes we will use on the page will always be the first step.
/* require necessary classes */
dojo.require('dijit.layout.AccordionContainer');
dojo.require('dijit.layout.AccordionPane');
dojo.require('dijit.layout.TabContainer');
dojo.require('dijit.layout.ContentPane');
dojo.require('dijit.layout.BorderContainer');
dojo.require('dijit.form.Button');
dojo.require('dojo.behavior');

/* when all classes have loaded... */
dojo.ready(function() {

	// subsequent code goes here

});
Try keeping your dependencies down -- less classes to load means faster application performance.
Building the Layout
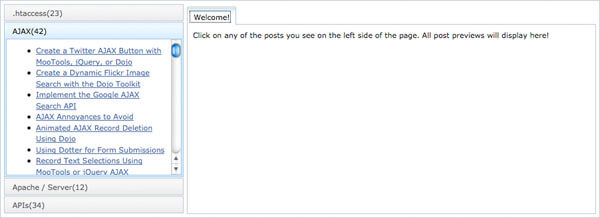
The first step is to build the layout. I'm going to create a two column layout, encompassed by a BorderContainer, in which the left side will provide categories and articles via an AccordionContainer layout. The right side will feature a TabContainer layout with a separate tab opening for every article requested.
/* generate the layout */

// settings
var appbase = dojo.byId('appbase');

// create the layout container
var container = new dijit.layout.BorderContainer({
	design: 'sidebar',
	gutters: true
},dojo.create('div',{ style:'height:100%;width:100%;' },appbase));

// create the left sidebar
var accordionContainer = new dijit.layout.AccordionContainer({
	splitter: true,
	region: 'leading'
},dojo.create('div',{ style:'height:100%;width:30%;' },container.domNode));
container.addChild(accordionContainer);

// create the right content pane
var tabContainer = new dijit.layout.TabContainer({
	tabPosition: 'top',
	region: 'center'
},dojo.create('div',{ style:'height:100%;width:70%;' },container.domNode));
container.addChild(tabContainer);

// add an initial tab to the tabContainer
tabContainer.addChild(new dijit.layout.ContentPane({
	title: 'Welcome!',
	content: 'Click on any of the posts you see on the left side of the page.  All post previews will display here!'
},dojo.create('div',{},tabContainer.domNode)));

// start the layout up!
container.startup();
A persistent "welcome" tab is added just so there is always a tab open.
JSON Content Loading - Categories & Posts
Loading the category list is the first order of business. When the JSON list of categories is returned, a new AccordionPane is added to the Accordion for every category returned:
// create a var to store currently displayed posts
var displayedPosts = [];

// load json topics
dojo.xhrGet({
	url: '/',
	handleAs: 'json',
	content: {
		json: 'get_category_index'
	}
}).then(function(response) {
	// for every topic...
	dojo.forEach(response.categories,function(category,i) {
		// create a new accordion item
		var pane = new dijit.layout.AccordionPane({
			title: category.title + '(' + category.post_count + ')'
		},dojo.create('div',{ innerHTML: 'Loading ' + category.title + ' posts...' },accordionContainer.domNode));
		accordionContainer.addChild(pane);
After the AccordionPane is within the Accordion, the next step is adding an onShow event to the AccordionPane which will load posts within the given category when the category receives focus:
// when this pane becomes selected...
var beenSelected = false;
dojo.connect(pane,'onShow',function() {
	// if not selected yet...
	if(!beenSelected) {
		beenSelected = true;
		// get posts for this category;  limit 100
		dojo.xhrGet({
			url: '/',
			handleAs: 'json',
			content: {
				json: 'get_category_posts',
				slug: category.slug,
				count: 100
			}
		}).then(function(postsResponse) {
			// empty content for the pane (removes loading message)
			pane.set('content','');
			// make content!
When the posts are loaded, a list of links is added to the AccordionPane:
// make content!
var ul = dojo.create('ul',{},pane.domNode);
dojo.forEach(postsResponse.posts,function(post) {
	//create list items and links
	var li = dojo.create('li',{},ul),
		a = dojo.create('a',{
		href: '/' + post.slug,
		innerHTML: post.title
	},li);
With every link we create, it's necessary to add a click event which stops the user from leaving the page and generates a tab within the right TabContainer widget:
// when the link is clicked, create a new tab pane and "select" it
dojo.connect(a,'onclick',function(e) {
	// stop propagation
	dojo.stopEvent(e);
	// if this post isn't already open, create it...
	if(!displayedPosts[post.slug]) {
		//add a new tab content pane
		displayedPosts[post.slug] = new dijit.layout.ContentPane({
			title: post.title,
			content: '<h1>' + post.title + '</h1>' + post.content,
			closable: true
		});
		// add and select this tab
		tabContainer.addChild(displayedPosts[post.slug]);
The next step is turning the "Continue Reading" and "Discussion" links into Dijit Button instances:
// make links into buttons
dojo.behavior.add({
	'.conred,.concom,.demo': function(node) {
		var button = new dijit.form.Button({},node);
		dojo.connect(button,'onClick',function() {
			window.location = node.href;
		});
	}
});
dojo.behavior.apply();
//when this tab is closed, remove it from the opened list
dojo.connect(displayedPosts[post.slug],'onClose',function() {
	displayedPosts[post.slug] = false;
	return true;
});
To finish things off, we direct the first AccordionPane to show (and thus load posts) and then direct the Accordion to start up:
								}
								// select the tab!
								tabContainer.selectChild(displayedPosts[post.slug]);
							});
						});
					});
				}
			});
			//if this is the *first* pane, load the content
			if(i == 0) pane.onShow();
		});
	});
	// start up the accordion!
	accordionContainer.startup();
});
The code itself should be fairly self explanatory; my comments should be of help.
The Complete JavaScript
Here's the complete JavaScript source:
/* require necessary classes */
dojo.require('dijit.layout.AccordionContainer');
dojo.require('dijit.layout.AccordionPane');
dojo.require('dijit.layout.TabContainer');
dojo.require('dijit.layout.ContentPane');
dojo.require('dijit.layout.BorderContainer');
dojo.require('dijit.form.Button');
dojo.require('dojo.behavior');

/* when all classes have loaded... */
dojo.ready(function() {

	/* generate the layout */

	// settings
	var appbase = dojo.byId('appbase');

	// create the layout container
	var container = new dijit.layout.BorderContainer({
		design: 'sidebar',
		gutters: true
	},dojo.create('div',{ style:'height:100%;width:100%;' },appbase));

	// create the left sidebar
	var accordionContainer = new dijit.layout.AccordionContainer({
		splitter: true,
		region: 'leading'
	},dojo.create('div',{ style:'height:100%;width:30%;' },container.domNode));
	container.addChild(accordionContainer);

	// create the right content pane
	var tabContainer = new dijit.layout.TabContainer({
		tabPosition: 'top',
		region: 'center'
	},dojo.create('div',{ style:'height:100%;width:70%;' },container.domNode));
	container.addChild(tabContainer);

	// add an initial tab to the tabContainer
	tabContainer.addChild(new dijit.layout.ContentPane({
		title: 'Welcome!',
		content: 'Click on any of the posts you see on the left side of the page.  All post previews will display here!'
	},dojo.create('div',{},tabContainer.domNode)));

	// start the layout up!
	container.startup();

	// create a var to store currently displayed posts
	var displayedPosts = [];

	// load json topics
	dojo.xhrGet({
		url: '/',
		handleAs: 'json',
		content: {
			json: 'get_category_index'
		}
	}).then(function(response) {
		// for every topic...
		dojo.forEach(response.categories,function(category,i) {
			// create a new accordion item
			var pane = new dijit.layout.AccordionPane({
				title: category.title + '(' + category.post_count + ')'
			},dojo.create('div',{ innerHTML: 'Loading ' + category.title + ' posts...' },accordionContainer.domNode));
			accordionContainer.addChild(pane);
			// when this pane becomes selected...
			var beenSelected = false;
			dojo.connect(pane,'onShow',function() {
				// if not selected yet...
				if(!beenSelected) {
					beenSelected = true;
					// get posts for this category;  limit 100
					dojo.xhrGet({
						url: '/',
						handleAs: 'json',
						content: {
							json: 'get_category_posts',
							slug: category.slug,
							count: 100
						}
					}).then(function(postsResponse) {
						// empty content for the pane (removes loading message)
						pane.set('content','');
						// make content!
						var ul = dojo.create('ul',{},pane.domNode);
						dojo.forEach(postsResponse.posts,function(post) {
							//create list items and links
							var li = dojo.create('li',{},ul),
								a = dojo.create('a',{
								href: '/' + post.slug,
								innerHTML: post.title
							},li);
							// when the link is clicked, create a new tab pane and "select" it
							dojo.connect(a,'onclick',function(e) {
								// stop propagation
								dojo.stopEvent(e);
								// if this post isn't already open, create it...
								if(!displayedPosts[post.slug]) {
									//add a new tab content pane
									displayedPosts[post.slug] = new dijit.layout.ContentPane({
										title: post.title,
										content: '<h1>' + post.title + '</h1>' + post.content,
										closable: true
									});
									// add and select this tab
									tabContainer.addChild(displayedPosts[post.slug]);
									// make links into buttons
									dojo.behavior.add({
										'.conred,.concom,.demo': function(node) {
											var button = new dijit.form.Button({},node);
											dojo.connect(button,'onClick',function() {
												window.location = node.href;
											});
										}
									});
									dojo.behavior.apply();
									//when this tab is closed, remove it from the opened list
									dojo.connect(displayedPosts[post.slug],'onClose',function() {
										displayedPosts[post.slug] = false;
										return true;
									});
								}
								// select the tab!
								tabContainer.selectChild(displayedPosts[post.slug]);
							});
						});
					});
				}
			});
			//if this is the *first* pane, load the content
			if(i == 0) pane.onShow();
		});
	});
	// start up the accordion!
	accordionContainer.startup();
});
It may look like there's a lot of JavaScript but don't get intimidated by it; when you break down each code block, it should all make sense.
Room For Improvement
I've chosen to simply load posts and their previews. You could easily load the complete posts with comments and all! JSON API provides you more than enough methods to create a complete blog layout with JSON and whichever JavaScript toolkit you'd like.
If I were looking to port this code to other sites or simply want to keep adding to the class, I would make this code into a custom Dijit widget. I may do that in the future to show you how it's done.
There you have it! The amount of existing code provided to you by Dojo, paired with its intelligent design and awesome Dijit architecture, makes creating advanced layouts quick, easy, and accessible. I especially like how easy dealing with JSON and callbacks is with Dojo promises. Have any suggestions for this layout? Share them!


i’ve been following your dojo posts here and at sitepen – thanks for all the dojo love.
one small correction… your sample css code only needs to be the first import. claro.css imports all the others already (see http://bugs.dojotoolkit.org/browser/tags/release-1.5.0/dijit/themes/claro/claro.css). you probably already knew this since your demo page looks like it has this fixed.
Ugh, you’re right; my bad. Updated.
sick!
I have been playing with json and wordpress lately also, but nothing like this.
hi David,
i was trying to do the dojo word press experiment. Took me 2 days to follow it. I got that almost every thing right.
things i liked in this are:
>>variable “beenSelected” nicely got closed forming closure.
>>variable “displayedPosts” was declared as Array, but later in code it was used as an assosiative array. i didn’t know this one till now.
Thanks for this. keep posting more things on dojo with all key JavaScript features highlighted.
I realize that the discussion on this post seemed to end last year however I just recently found this site.
I wish Firefox was the only browser that I have to support however I also have to support IE 7, which seems to have problems with the sizing so the demo shows a single line.
I have tried setting the height and width in a CSS, but can’t get the demo to display.
can u pls provide the full code? i did copy ur demo code, but cant work much, cant load the accordion menu with others, i really like this feature .thx
Hi David,
Nice one! Really useful.
I was wondering… can you please share the json file?
Seen here…
 			dojo.xhrGet({

				url: '/',

				handleAs: 'json',

				content: {

					json: 'get_category_index'

				}
the url for the file, but i couldn’t find it..
Really appreciate if you could share.
Thank you in advance,
All the best!
Alex