Visual Regression Testing For Angular Applications
I recently planned a major CSS refactoring project to transition a large e-commerce site from an antiquated 1024px design to a more modern, responsive design.
This situation is of course not unique. Responsive design has officially made it's way from UX blogs to the corner office - the web will henceforth be stretchy.
Perils of responsive development
As we enter this era of building for multi-device usability it's important to mitigate the common pitfalls of responsive development, which, among others, include:
-
The responsive multiplier effect If you are one who thought css was quirky before, then you may want to sit down for this: Retrofitting your site with new responsive breakpoints will multiply that mystery by 2, or 3 or more - especially if you are not able to use a battle-tested framework like Bootstrap or foundation etc...
-
Sleeping dragons Even if you have the luxury of starting your css project from scratch, when developing your css, mistakes often happen in breakpoints you can't see. For example, when tweaking a mobile view, the desktop view may get a regression - and because visual testing requires physically manipulating the size and and scroll position of the browser viewport, it's just not possible for a developer to catch everything.
-
Death by a thousands bugs If you are not automating visual regression testing, A big refactor job can easily overwhelm a QA group with an unnecessarily high count of CSS bugs in a single sprint.
Responding to responsive development
The responsible thing to do given these exposures is to mitigate visual bugs through automated visual testing - that is in this case, to programmatically compare renderings of responsive content at different viewport sizes to ensure changes made at one screensize won't break a layout at another screen size. Automating this process is key - because your computer never gets tired of comparing the same design over and over. This is critical to reducing bugs going to your QA process, or worse, to production.
This is where BackstopJS comes in. BackstopJS is a straightforward, config-based tool which makes it easy for a developer to automate visual testing of multiple URLs at multiple screen sizes. Here's the basic idea:
-
First, take reference screenshots Once you have a working CSS implementation, BackstopJS takes a set of reference screenshots. These screenshots will be saved for later comparisons.
-
Test your CSS after making changes: Let's say in step 1 above, you had a perfect desktop view and you then started working on a mobile view. After working on your mobile view, you can run a test to ensure none of your changes on mobile have broken your desktop view.
-
Repeat You can continue repeating the reference/test process to ensure you're always moving forward in all views.
This approach becomes even more effective when making changes to existing projects where you want to ensure adding a new feature to existing designs won't disrupt other areas.
Timing is everything
The original use-case for BackstopJS was testing multiple static web pages, so initially, it would render a screenshot just after a requested page was loaded. This worked great for big, primarily static server side apps, but what about single page applications and pages which use progressive enhancement? These are cases where we need to explicitly tell BackstopJS when the page is ready of it's "closeup".
In it's latest release (0.4.0), BackstopJS addresses this conundrum with two new config options: readyEvent and delay. The readyEvent specifies a string (that is logged to the console by your app) to wait for before taking a screencapture. The delay parameter specifies a duration (in milliseconds) to wait for before taking a screencapture. They can also be used together, in which case BackstopJS first waits for the readyEvent then waits for the additional duration of the delay parameter to take the screenshot.
Lets see it in action!
An obvious scenario where you would want to wait before taking a screenshot is when you're waiting for an ajax call to complete and send information to the view. But a more interesting (and possibly more tricky) scenario may be when waiting for an interstitial animation to complete. Lets take a look at that case...
Please note: this exercise requires Node and NPM to be installed, more info here
I've prepared a simple AngularJS app for us to test. Download the myAngularProject.zip file here and expand the project somewhere in your dev environment.
Lets look at the project directory:

Install BackstopJS
This is the simple AngularJS project we will work on. Next step is to install BackstopJS. In your terminal, cd to your ./myAngularProject location and run
$ npm install backstopjs
The above command will create the folder structure ./node_modules/backstopjs within ./myAngularProject as in the figure below.

There are three other dependencies for BackstopJS. They are currently not included in the BackstopJS package.
If you don't already have a current global Gulp instance...
$ sudo npm install -g gulp
If you don't already have a current global PhantomJS install...
$ sudo npm install -g phantomjs
If you don't already have a current global CasperJS install…
$ sudo npm install -g casperjs
Review our project files
Lets look at the page we will test. Open up ./simple.html.
This is the file we will use for our test demonstration. It consists of a heading and two grey boxes of content. Simple enough...

Now lets look at the backstopjs config file. Open up ./backstop.json
This is the config file which BackstopJS looks for when running tests on your project. The first node: viewports takes a list of viewport objects consisting of a name and the dimensions of the viewport we are simulating - in this case we are setting three sizes. The second node: scenarios is a list of scenarios for the test where we specify the testName, url, DOM selectors we want to test and optional readyEvent and delay parameters.
Please take note: the URL parameter works like anchor tag href property. If you begin the file path string with http:// you will pull a page at a specified internet domain. If you simply enter test/simple.html you will be making a relative file request which is relative to the ./node_modules/backstopjs/ directory, e.g., ../../simple.html refers to the file at the root of myAngularProject.

So, with our project in place and BackstopJS loaded, Lets get to it.
Run our tests for the first time
First, make sure you working directory is ./myAngularProject/node_modules/backstopjs
Next, Create reference files for the project...
$ gulp reference
...and immediately run a test:
$ gulp test
When the test sequence ends BackstopJS should open up the results in Chrome. Since we didn't make any changes between our reference screens and our test screens everything should pass...

Make changes and test again
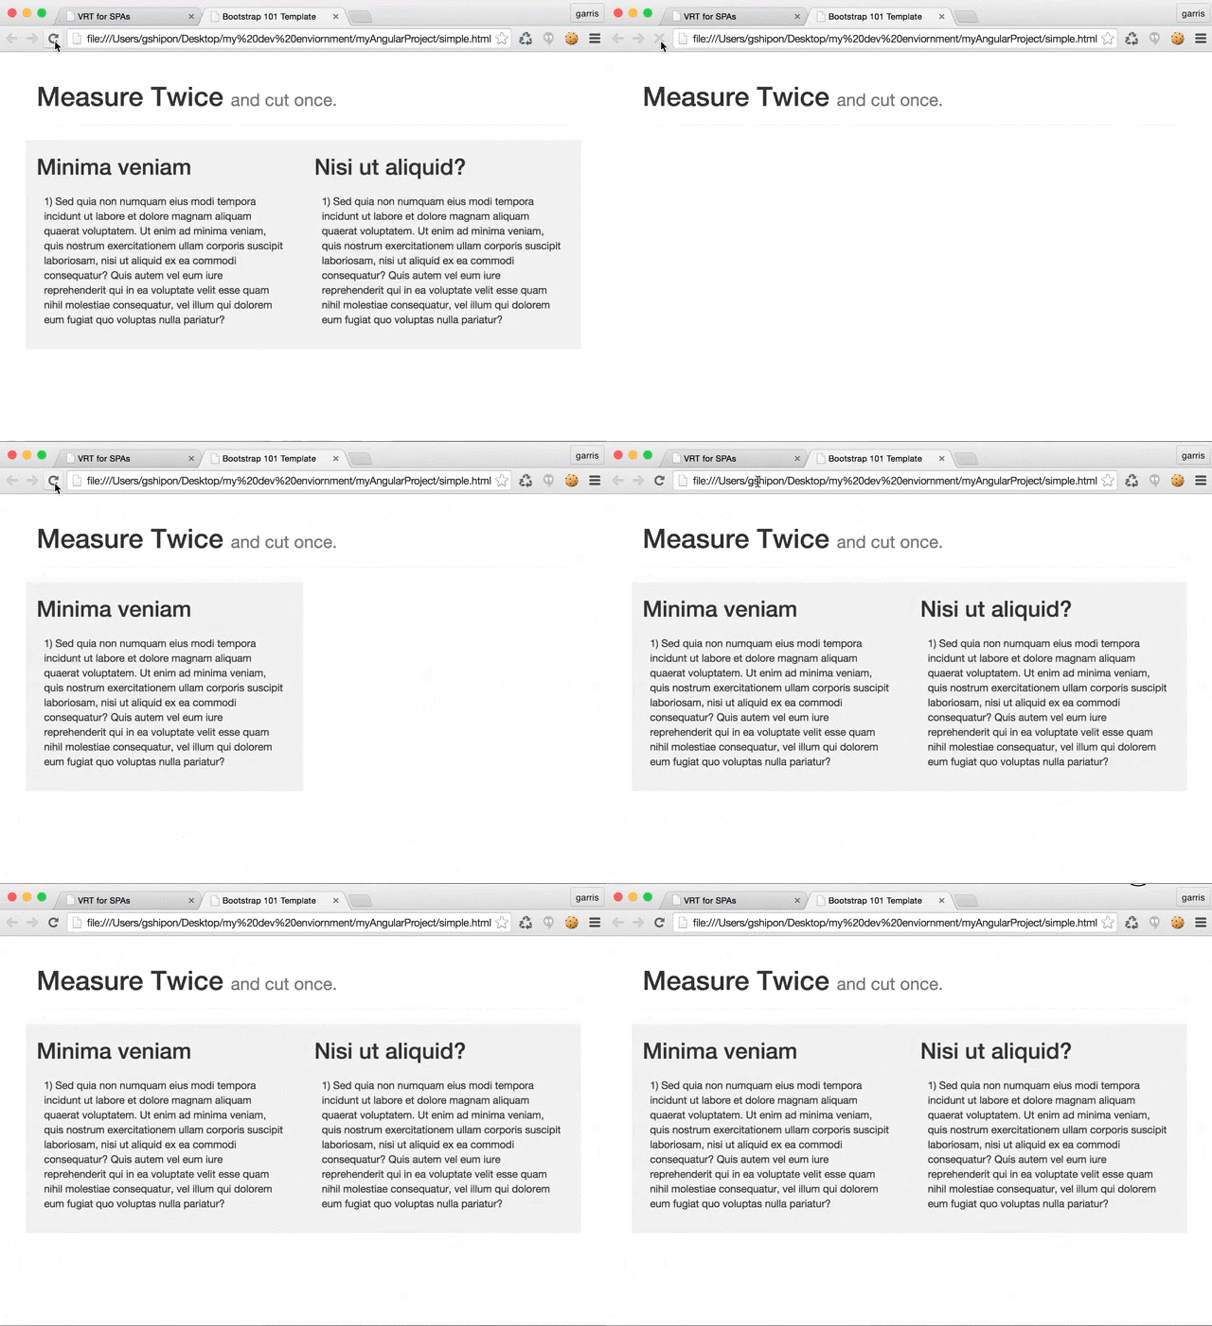
Now let's make a change. Open up simple.html again and uncomment lines 30 through 38. This will add a dazzling animation to our simple app.

And you should see...

I know. Dazzling right?
So lets test this. We should get a very different result...
$ gulp test

So don't panic - this is completely expected. Those elements are missing because our screenshot was taken just as the page finished loading. But we need to wait a little bit until our animation is complete to take our screenshots.
Enhance your app's communication skills
So how long should we wait? With web development, in practice, most of the time we don't know. There usually are all kinds of asynchronous things going on in most web apps and it's really best if the app can determine when all dependent activity (e.g. ajax calls, animations, font loading etc.) is complete - then send a signal.
In our case it's already been done. Our Angular app is listening to the animationEnd event of the second content block and logging the text backstop.ready to the console.
Let's take advantage of this and update our backstop.json config to let BackstopJS know when the app is really ready to be evaluated.
Open up ./backstop.json again and change the readyEvent parameter to "backstop.ready"

Now let's try it again.
First, "bless" our config change... (see note below on gulp bless*)
$ gulp bless
And second, re-run our new and improved test...
$ gulp test
And Viola! (And by "Viola" I mean, the tests should have all passed.)
We could have used the delay property instead -- go ahead and set the readyEvent to null and change the delay value to 2000. See what happens.
In the end, you may prefer the event method or the delay method or both. it's up to you to decide which is the best method for you to use.
Summing it up
At this point, some of you may be thinking, hey Garris, BackstopJS is a cool tool and all, but you didn't show how it finds responsive bugs. The reason for that is there are already demos out there illustrating that subject. With this demo I wanted to highlight the special (and maybe non-obvious) considerations around visual testing for client-side apps (as opposed to server-side apps).
This technique can be used in all kinds of SPAs, progressive enhancement scenarios and 3rd party widgets (e.g. Twitter, Facebook, stocks, weather, hero image sliders, etc.)
As with most testing methods it really helps to have data stubs to make sure that you're comparing apples to apples every time. That said, for cases where that isn't possible, BackstopJS also accepts a blacklist of DOM selectors, so you can choose to ignore things like banners or other dynamic content - more info in the documentation.
BackstopJS is optimized for testing a large number of pages (or URL states if it's an SPA). As opposed to going for deep interactions BackstopJS is meant more as a sanity check you can actively use during CSS development.
For more deeper visual app testing, (including intermediate states and micro interactions) I recommend trying PhantomCSS or writing your own CasperJS scripts. If you've followed this tutorial then you already have many of tools you need loaded on your machine.
I've found that once I got used to automating visual testing it's hard to start a new large project without it.
I'd love to hear from you if you are using BackstopJS in your development group. Drop a line to let me know! @garris
* In most cases you would want to re-run gulp reference when updating a config file. For this demo here we are overriding that behavior. We do this with gulp bless as shown above.

About Garris Shipon
Garris lives in Berkeley California and is currently obsessed with creating super responsive discovery experiences. Read more at http://garriss.wordpress.com/about/


Hello,
I released another CSS regression testing tool: http://succss.ifzenelse.net
It is easier to install than BackdropJS and more flexible than PhantomCSS. Among other interesting features, it’s has Gecko engine support through SlimerJS. It’s worth a try !
Thanks
This is a nice tutorial and the possibilities of BackstopJS are exciting but I can’t help but feel the architecture of the tool is wonky which makes me doubt how dependable it really is. My cwd has to be node_modules/backstopjs for it to work? My interface with it is it’s gulpfile? I have to manually stop the node server it spins up via
gulp stop? I’ve used a lot of node modules and node based tools, and I’ve never seen one architected in that way. It seems like I would have to jump through a lot of hoops to integrate backstopJS into my app’s own gulpfile. I think you should consider providing a plain JS API that I canrequireand develop against rather than the current combo of a config JSON plus gulp commands in the shell. Does anyone else feel that way? Anyways, it still looks like an awesome tool.Checkout Bivariate:
An opinionated interface for writing, running, and saving BackstopJS tests.
https://github.com/jparkerweb/Bivariate
There is a great tool that maybe you are not familiar with – Screenster (http://screenster.io). It is a test automation tool and 10 times more productive than any other tool, working on the cloud and codeless.