Build a Street Fighter Demo with CSS Animations and JavaScript
I recently learned a cool technique from Simurai about how to animate PNG sprites with the CSS3 animations' steps() property. The main idea in this technique is to "recreate" some kind of animated GIF but with the tiles of a PNG sprite.
As with everyone I know, I played to Street Fighter in my childhood and when I saw this ... guess what popped in my head?
If the pen doesn't render above, click here to see it in action.
Let's Create the First CSS Move
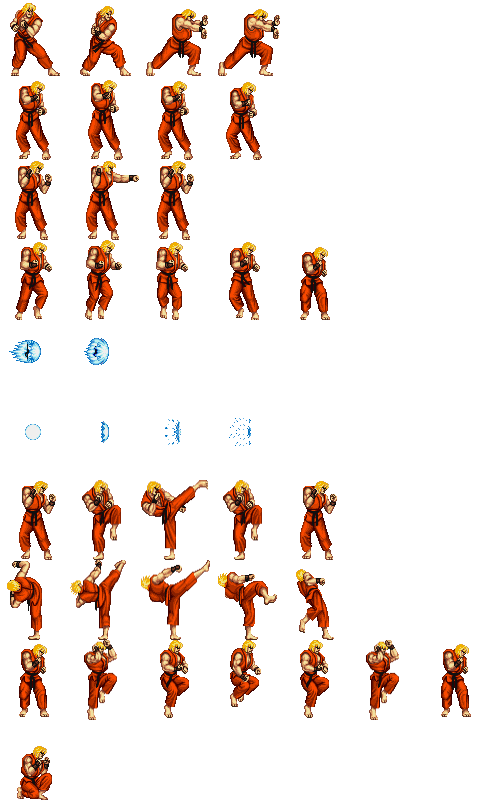
We'll start with the punch (see in the sprite bellow it's the third one). First we need to open Photoshop to create the sprite. Make all images the same size (these ones are 70px width and 80px height). There is a good app called Texture Packer which can help in creation of game sprites. Try to find the dimensions of the biggest of your frames and use these dimensions for your grid. At the end you'll get something like this:
Then we need to set up a DIV for Ken which will receive our punch move (and all our other future moves):
/* html */
<div class="ken"></div>
/* css */
.ken {
    width:70px; height:80px; /* exactly the size of an image in our sprite */
    background-image:url('../images/sprite.png');
}
Let's assume vendor prefixes are implicitly working. Now we can declare the punch animation like this:
/* css */
.punch {
    animation: punch steps(4) 0.15s infinite;
}
@keyframes punch {
    from { background-position:0px -160px; }
    to { background-position:-280px -160px; }
}
What we just did is apply an animation (punch) to a class name (.punch) which basically animates background-position from 0px to -280px (on x axis). This animation will be broken into 4 parts (steps(4) which corresponds to the punch's 4 images), and it will take 0.15 second to perform; then it will start over infinitely.
Finally we need a way to add/remove the .punch class name on DIV.ken when another key is pressed.
/* javascript */
$(document).on('keydown', function(e) {
    if (e.keyCode === 68) { // 68 is the letter D on the keyboard
        $('.ken').addClass('punch');
        setTimeout(function() { $ken.removeClass('punch'); }, 150);
    }
});
We used jQuery to addClass('punch') if the letter "D" is pressed and then remove it after a setTimeout (a delay) of 150ms (remember our css animation takes exactly 0.15s wich is the same as 150ms). That's pretty much all you need to know to create a lot more moves.
Take it to the Next Level with SASS
If you pay attention to what we are doing, you'll notice we have some values that never change (width/height of an image in the sprite), and, after you've created some other moves, you'll notice you have a lot of code duplication which will be difficult to read and maintain in the future. SASS can help us DRY all this mess!
First we need basic @mixins like animation() and keyframes():
@mixin animation($params) {
    -webkit-animation:$params;
    -moz-animation:$params;
    -ms-animation:$params;
    animation:$params;
}
@mixin keyframes($name) {
    @-webkit-keyframes $name { @content }
    @-moz-keyframes    $name { @content }
    @-ms-keyframes     $name { @content }
    @keyframes         $name { @content }
}
We need to store image width / height values and SASS variables exist for this reason:
$spriteWidth:70px;
$spriteHeight:80px;
And finally we can mix those together to create a complicated new mixin which will declare moves and handle correct calculation of background positions for us:
@mixin anim($animName, $steps, $animNbr, $animParams){
    .#{$animName} {
        @content;
        @include animation($animName steps($steps) $animParams);
    }
    @include keyframes($animName) {
        from { background-position:0px (-$spriteHeight * ($animNbr - 1)); }
        to { background-position:-($spriteWidth * $steps) (-$spriteHeight * ($animNbr - 1)); }
    }
}
Now you can create a new move with a single line of code:
$spriteWidth:70px;
$spriteHeight:80px;

/* punch */
@include anim($animName:punch, $steps:3, $animNbr:3, $animParams:.15s infinite);
/* kick */
@include anim($animName:kick, $steps:5, $animNbr:7, $animParams:.5s infinite);
/* hadoken */
@include anim($animName:hadoken, $steps:4, $animNbr:1, $animParams:.5s infinite);
...
$animNbr is very important: the calculation is based on this number. In fact it's just the moves count in the sprite. Our first example was the punch, right? And in our sprite it's the move number 3. The kick is number 7, etc.
Add Collision Detection for the Fireball
We need a very fast loop for collision detection. It will test the fireball position (offset) every 50 milliseconds, compare it to something else position (here we test the end of the screen). If the fireball's left position is bigger than the window width, then it means the fireball overtaken the screen so we immediately apply an .explode class.
Here's how I did it; it's not perfect but it works very well:
var $fireball = $('<div/>', { class:'fireball' });
$fireball.appendTo($ken);

var isFireballColision = function(){
    return $fireballPos.left + 75 > $(window).width();
};

var explodeIfColision = setInterval(function(){
    $fireballPos = $fireball.offset();
    if (isFireballColision()) {
        $fireball.addClass('explode');
        clearInterval(explodeIfColision);
        setTimeout(function() { $fireball.remove(); }, 500);
    }
}, 50);
What's Next?
We could easily add some sound effects, background music, sprite another character, mix this up with web RTC to allow multiple computers to control characters (I don't know something with NodeJS and Socket.io or maybe the cool new Meteor framework); that's what I love with web development: it's almost limitless.
About Julien Knebel
I'm a freelance front-end developer living and coding in Paris, France. I love combining design techniques with web development technologies.


very cool dude !
Alright Adam, this is good stuff here, thanks for sharing
Um I meant David lmao
Great stuff !!!!
comment post without refreshing??
This is sweet. I saw this thing last week and thought it was incredibly awesome. I’m probably going to link to this post in DZone’s link roundup.
Très beau travail Julien, merci pour le partage :)
Merci ! Had a lot of fun making it :P
WOW!
that is awesome work!
This is such a detaild demo and I love the free vectors that you showed. I will try to put it together since I`m a new in game developing , and see how it works. Best wished dude.
Hah! I don’t think I might need to use this any time soon, but it’s nonetheless a wicked way to use CSS & company :-)
One thing though, the CodePen demo does not play nicely with arrows–the page scrolls indeed (yes, a laptop doesn’t have as much screen space as a huge monitor!)
Wowwwwwwww great job David !!!!!!!!!!
*cough cough* my name is Julien :)
Bien vu dude ! ;)
That’s superb! Hope to try it soon.
Wow! Cool! Great job!
Mind blowing, i visited on your website cause i am crazy to learn.. But i bit upset cause JavaScript sections is not in English language, and hard to understand and learn :(
@Julien Please add some kind of translator or convert it in Eng. language, so that the snippet by you will be helpful for everyone :)
Argh sorry bro i didn’t except this demo would attract so much people. I’ll let you know asap cheers!
I am not a game fan but doing this using CSS3 is amazing. Good job!
Its really cool. Hats of to you and keep it up. There is so much to learn.
Arun
The reverse kick sprite does not complete it’s animation???
Great Job David … Just keep it up , bunch of techniques learned by you … thank you .
this is a nice demostration of why html5 should never be an standar for games.
wOw great JOB man ,super cool stuff. sharing is good thnx man
Rather a nice article. I am going to try it myself a couple of times. :-)
Oh Shit!!!!! floor is equal to Bison, levitating, that pig!
Thanks for the article!
Made my DBZ version:
https://developer.mozilla.org/pt-PT/demos/detail/dbz-css-animations/launch
OMG man it rocks! On the MDN Demo home page :D You made my day. Happy to see people taking it a step further. Well done.
Explain please where did you get these sprites? Manual extraction?
Found it on The Spriter Resource : http://www.spriters-resource.com/snes/supersf2/sheet/5556
They have tons of cool sprites ;)
It only contains sprites with backgrounds. How can I get transparent images like the one you used in your demo for KEN.
Will be my default Easter Egg! Nice!
I have just started using similar techniques for animations myself, however I’ve run into a problem that your demo suffers from as well…browser zoom. When zooming all my responsive images work as they should do, but because of the nature of the sprites the animations break. I’m going to work on a solution but just wondered whether you had realised this and worked out a solution yourself?
Nop had the same issu, but I don’t feel like it’s a real problem after all? I guess… :)
Just found this today and thought it might be a nice addition to the post. Multiple animated gif backgrounds from arcade games: http://abduzeedo.com/wicked-fighting-game-background-gifs
Man it’s totally rocking awesome!! :D I wish I could have time to continue my demo with one of these gif backgrounds.
Amazing code! If you don’t mind I may try a similar project and reference this demo.
Sure! I’d love to see that when it’s ready :)
Dude you’ve opened doors to many innovations here. Well done! thank you!!!
How would the code look like if you wanted the user to execute certain commands before executing a move? e.g down,forward,down,froward + hit = shoryuken. Thanks in advance it is highly appreciated as always! :)
Doesn’t work in IE9. :-) But,… neither does my website,… so I’m okay with that. LOL
Thanks David
I built this site
http://havenramos.com/
based on the techniques outlined on your post. I tweaked the examples to make it responsive.
Amazing code!
I just discovered TexturePacker.