Facebook Sliders With Mootools and CSS – Now With Image Generation!
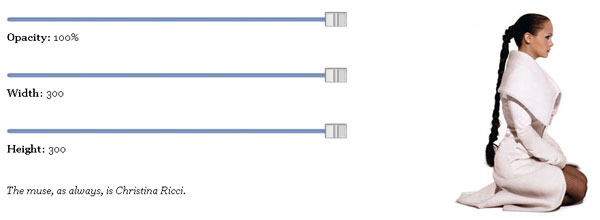
A few weeks back, I posted Facebook Sliders With Mootools and CSS, which explain how to create Facebook-style sliders that control the height, width, and opacity of an image:
After tinkering around a bit, I modified the script to use PHP to save the resulting image.
Step 1: The Original XHTML and CSS
<img src="muse.jpg" id="muse" />

<div id="opacity-area">
	<div id="opacity-slider"></div>

</div>
<div>
	<strong>Opacity:</strong> <span id="opacity-label"></span>%
</div>
<br /><br />

<div id="width-area">
	<div id="width-slider"></div>
</div>
<div>
	<strong>Width:</strong> <span id="width-label"></span> pixels

</div>
<br /><br />

<div id="height-area">
	<div id="height-slider"></div>
</div>
<div>
	<strong>Height:</strong> <span id="height-label"></span> pixels
</div>
<br /><br />
<p><a href="#" id="save-image">Save Customized Image</a></p>
#opacity-area, #width-area, #height-area		{ background:url(horizontal.jpg) 0 8px no-repeat; height:23px; width:500px; margin:0 0 5px 0; }
#opacity-slider, #width-slider, #height-slider	{ background:url(button-horizontal.jpg) no-repeat; width:33px; height:23px; cursor:pointer; }
The above code is explained in the original article.
Step 2: The New Moo
window.addEvent('domready', function () {
	/* opacity slider */
	var mySlide = new Slider($('opacity-area'), $('opacity-slider'), {
		steps: 100,
		wheel: 1,
		onChange: function(step){
			$('opacity-label').set('html',step);
			$('muse').set('opacity',step / 100);
		}
	}).set(100);

	/* height slider */
	var mySlide = new Slider($('height-area'), $('height-slider'), {
		steps: 300,
		wheel: 1,
		onChange: function(step){
			$('height-label').set('html',step);
			$('muse').set('height',step);
		}
	}).set(300);

	/* width slider */
	var mySlide = new Slider($('width-area'), $('width-slider'), {
		steps: 300,
		wheel: 1,
		onChange: function(step){
			$('width-label').set('html',step);
			$('muse').set('width',step);
		}
	}).set(300);

	/* link click */
	$('save-image').addEvent('click',function() {
		alert('generating...');
		$('muse').set('src','sliders-ajax-save-php.php?width=' + $('width-label').getText() + '&height=' + $('height-label').getText() + '&opacity=' + $('opacity-label').getText());
		$('muse').setStyles({
			'border':'2px dotted #999;',
			'padding':'10px'
		});
		$('muse').set('opacity',100);
		alert('done!');
	});
});
I've added an AJAX tidbit that sends the width, height, and opacity to the PHP script.
Step 3: The PHP
/* do i even do anything? */
if(isset($_GET['opacity']) && isset($_GET['width']) && isset($_GET['height']))
{
	//initial vars
	$original_file = 'sliders/muse.png';
	$opacity = intval($_GET['opacity']) / 100;
	$width = intval($_GET['width']);
	$height = intval($_GET['height']);
	list($original_width,$original_height) = getimagesize($original_file);

	//create a new, virtual image
	$image = imagecreatetruecolor($width, $height);
	$source = imagecreatefrompng($original_file);
	filter_opacity($source,$opacity);
	imagecopyresized($image,$source,0,0,0,0,$width,$height,$original_width,$original_height);

	$background = imagecolorallocate($image, 0, 0, 0);
	imagecolortransparent($image, $background); // make the new temp image all transparent
	imagealphablending($image, false); // turn off the alpha blending to keep the alpha channel

	//output
	header('Content-type: image/png');
	imagepng($image);
	imagedestroy($image);
}


/* from PHP.net -- http://us2.php.net/manual/en/function.imagefilter.php */
function filter_opacity( &$img, $opacity ) //params: image resource id, opacity in percentage (eg. 80)
{
	//get image width and height
	$w = imagesx( $img );
	$h = imagesy( $img );

	//turn alpha blending off
	imagealphablending( $img, false );

	//find the most opaque pixel in the image (the one with the smallest alpha value)
	$minalpha = 127;
	for( $x = 0; $x < $w; $x++ )
		 for( $y = 0; $y < $h; $y++ )
			  {
					$alpha = ( imagecolorat( $img, $x, $y ) >> 24 ) & 0xFF;
					if( $alpha < $minalpha )
						 { $minalpha = $alpha; }
			  }

	//loop through image pixels and modify alpha for each
	for( $x = 0; $x < $w; $x++ )
		 {
			  for( $y = 0; $y < $h; $y++ )
					{
						 //get current alpha value (represents the TANSPARENCY!)
						 $colorxy = imagecolorat( $img, $x, $y );
						 $alpha = ( $colorxy >> 24 ) & 0xFF;
						 //calculate new alpha
						 if( $minalpha !== 127 )
							  { $alpha = 127 + 127 * $opacity * ( $alpha - 127 ) / ( 127 - $minalpha ); }
						 else
							  { $alpha += 127 * $opacity; }
						 //get the color index with new alpha
						 $alphacolorxy = imagecolorallocatealpha( $img, ( $colorxy >> 16 ) & 0xFF, ( $colorxy >> 8 ) & 0xFF, $colorxy & 0xFF, $alpha );
						 //set pixel with the new color + opacity
						 if( !imagesetpixel( $img, $x, $y, $alphacolorxy ) )
							  { return false; }
					}
		 }
	return true;
}
If all of the required information is provided in the URL, we create a new "virtual" image using PHP's GD library. Once the virtual images is created, we import the original image and modify its width, height, and opacity. Once the image is created, we "push" it out and replace the original image on the page with the new image.
Notes
A few things I'd like to add:
- I took a code snippet from PHP.net to create the image opacity.
- As you can probably see, the opacity code isn't doing a great job. If you have recommendations for better code, please let me know.
- The Christina Ricci picture wasn't originally transparent. I removed the white portion of the image and made it transparent myself. It's not a refined image.


Not working on Konqueror :(
@Ayoze: Thank you for noting that. I don’t have Konqueror available to me, but I’m not surprised because MooTools doesn’t boast Konqueror support. I don’t believe Konquerer is considered an “A” grade browser.
@david: That’s true, but keep in mind that Konqueror 3.5+ normally handles moo quite well.
After all, WebKit (first KHTML), was posted over by Apple to create Safari. So earlier versions of Safari is basically a ported Konqueror.
All good people should read http://en.wikipedia.org/wiki/WebKit when they have some spare time :)
I get a lot of scripts working in Konqueror after a little tweaking, but normally the tweaking needed for Safari does the job automatically.
I like Konqueror, and test all my scripts there before deploying them.
Indeed! It is working straight away in Konqueror 3.5.9, which is great for most purposes.
(I may have missed it but would like to know what justifies the people of KDE to break konqueror in so many ways. Not even the terminal emulation is there in Konqueror 4.x)
Thanks for the article David. What I’d really like to see though is a scalable and extendable sliding range selector around your blog.
Btw. Correct me if I’m wrong but isn’t Konqueror using a chopped version of webkit? Quite odd that it has no love for MooTools.
for usability how would one make the opacity, height, and width text inputs?
work great! used to make a “coming soon” appears on an “under construction” site! to see it http://www.wokprod.com/
How can I apply this on a background?