Replicating the DOOM Screen Melt with JavaScript and Canvas
I love retro games almost as much as I love development and from time to time I find myself addicted to games I haven't played in 20 or more years. This weekend while loading up DOOM on my speedy 486/SX (a full 66mhz of speed!) I was reminded of the awesome screen melt effect when transitioning between menus and levels. From looking at it I really had no idea how it was accomplished, so seeing as DOOM is open source I went right to the source and I was surprised with how simple it is to achieve.
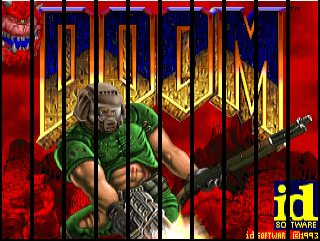
So how exactly does the effect work? First you need to logically divide the screen into columns allowing them to be moved independently.
Next Each column then needs to be assigned a height value that is less than 0. We start out by assigning the first column a random value between 0 and -100, and each neighboring column is assigned a random value within 50 of its neighbor. We also have a limit in place for the values, never allowing a value greater than 0, and never allowing a value less than our maximum deviation of -100.
These values aren't set in stone and can be played with, but the higher the deviation between columns the more random the effect will become. The reason behind keeping the columns values within a certain range of their neighbors is to create a rolling hill effect, this same method can also be used when creating simple 2d terrain.
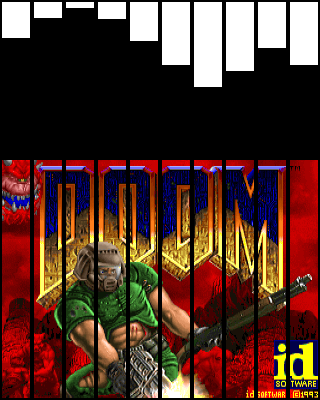
The next and final step is to lower the columns in order to reveal the image behind it. The "magic" of the melt effect is illustrated below. This should also make it clear why we need to assign negative values to begin with.
Implementation
When I implemented the effect I tried two different approaches direct pixel manipulation using getImageData and putImageData, and using standard drawImage with offsets. The drawImage approach was much faster and the method I'll be explaining.
We will use two images for the effect, the first image is the background and will be drawn first every tick, we will then draw the 2nd image in columns offsetting the y position of each column by its value incrementing the value every time the doMelt() function is called until all columns values are greater than the height of the image.
The HTML
The html needed is very minimal all we need is the canvas element
<canvas id="canvas"></canvas>
The JavaScript
For the melt effect we will create a canvas element in memory this is where we will draw the offset columns to, image1 and image2 hold references to image objects created within the js, bgImage and meltImage are used to swap between what image is the background and what image is melting.
var meltCan = document.createElement("canvas"),
meltCtx = meltCan.getContext("2d"),
images = [image1, image2],
bgImage = 1,
meltImage = 0,
The following settings are what will control how the resulting effect looks. colSize controls the width of the columns, maxDev controls the highest a column can go, maxDiff controls the maximum difference in value between neighboring columns, and fallSpeed controls how fast the columns fall.
settings = {
colSize: 2,
maxDev: 100,
maxDiff: 50,
fallSpeed: 6,
}
The init() function is where we setup our columns initial values and draw the image we are going to melt to our temporary canvas. We set the first element to a random number that falls between 0 and maxDev, then for each neighboring column pick a random value thats within the maxDiff range we set.
function init() {
	meltCtx.drawImage(images[meltImage],0,0);

	for (var x = 0; x < columns; x++) {
		if (x === 0) {
			y[x] = -Math.floor(Math.random() * settings.maxDev);
		} else {
			y[x] = y[x - 1] + (Math.floor(Math.random() * settings.maxDiff) - settings.maxDiff / 2);
		}

		if (y[x] > 0) {
			y[x] = 0;
		} else if (y[x] < -settings.maxDev) {
			y[x] = -settings.maxDev;
		}
	}
}
The doMelt() function is where the magic happens. First we draw our image thats behind the melting image to the canvas, another approach is to place the canvas element in front of an image and use clearRect to clear the canvas. However for this example we will just draw both images to the same canvas. Next we iterate through the columns incrementing their value by fallspeed. If the value is not greater than 0, it means the user cannot see the effect yet, so the columns y position (yPos) stays at 0. If the column value is greater than 0, the columns y position is set to the columns value. We then use drawImage to draw the column from the temporary canvas to the primary canvas using the offsetting its y by yPos.
The done flag stays true if the column values are greater than the height, and we swap images to do it again.
function doMelt() {
    ctx.drawImage(images[bgImage],0,0);
    done = true;

    for (col = 0; col < columns; col++) {
        y[col] += settings.fallSpeed;

        if (y[col] < 0 ) {
            done = false;
            yPos = 0;
        }else if(y[col] < height){
            done = false;
            yPos = y[col];
        }

        ctx.drawImage(meltCan, col * settings.colSize, 0, settings.colSize, height, col * settings.colSize, yPos, settings.colSize, height);
    }

    if(done){
        var swap = meltImage;
        meltImage = bgImage;
        bgImage = swap;
        init();
    }
    requestAnimationFrame(domelt);
}
The completed code and effect can be seen on CodePen: http://codepen.io/loktar00/details/vuiHw.
If you're curious as to how the masterminds of DOOM implemented the effect you can check it out at https://github.com/id-Software/DOOM/blob/master/linuxdoom-1.10/f_wipe.c


About Jason Brown
Government web developer in Nebraska who’s looking to get back to Michigan! Lover of JavaScript, canvas, game development, and retro gaming systems. When not programming I’m hanging out with the family or gaming with friends


I can’t recall of a 486 SX at 66 MHz. Maybe it was a DX/2?
MaxArt, you might be right Ill have to check it out today, maybe it is a DX/2, the one I was playing on most recently is a Unisys Cwd4002, which I *just* grabbed from Ebay a few weeks ago since I was having issues with the ISA bus on my 486 from my childhood :(.
Max is right – the SX was the DX with the FPU disabled, it was only available in the original chip release, max speed 33M…
Oh, you’ve all fallen asleep. I’ll just slip out quietly. Oh, yes, and when you wake up, get off my lawn.
You guys are correct, in my defense it boots up as a 80486DX2-S hence me saying SX :P.
Brilliant, sure I saw an emulated version of DooM somewhere using HTML5 Canvas… Also awesome.